Exporting images to disc from Lightroom, is a wonderful option to have, indeed. However it is also…. lacking. My goal is to burn a customer’s images to a CD, with an image containing folder, company information, copyright release, and anything else you might want to add automatically (think customer referral cards, or promotions).
Unfortunately, Lightroom just doesn’t handle this out of the box. Maybe some day. For now though, we are going to need some outside software. There are a few options you have here. I did consider using Jeffrey Friedl‘s Run Any Command plugin, and looked at Rob Cole‘s Exportant. In the end I decided to go a different route, but made a mental note to go back and play with Exportant. It looks pretty darn powerful.
We are going to use a three (3) step process and three (3) softwares to make these CDs. For software, we will need Lightroom (duh), Windows Command Line (built-in to windows), and ImgBurn, a free software that I was already using when burning customer CDs. It has some powerful features, like running from command line and batch processing.
Go ahead and download and install ImgBurn now if you don’t already have it. I believe I use all the default settings.
Normally, I don’t mind spending five or ten minutes exporting customer images out to a folder, opening up image burn. setting up a folder structure, including outside files (like a print release), burning files to disk, clearing exported images off hard drive. It’s really the least I can do, after all, a wedding, portrait or small team only generates a few disk order, so it’s not very much time. But what if you shoot a few football or swim or track team. Half the team orders images on disk and you have 4 to 8 hours or clicking and dragging to get those 30 disks processed. What if you shoot an entire league? Get that coffee brewing, it’s going to be a long day, and night, and day, and a few more nights! So lets see what we can do to speed up this process a bit.
Before I can run you through the processing steps, we have a little setup to do. Grab your coders hat, cheetos and a jolt cola. Let’s get started
Setup Step 1:
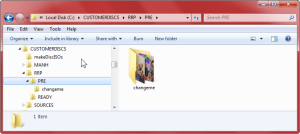
In lightroom, we have our images all picked out and organised. But we need a place to put them. We will set up a static location for all of this CD processing to take place. Open up windows explorer and navigate to the C: drive. Create a new folder named CUSTOMERDISCS (or whatever you want to name it). Under CUSTOMERDISCS, create the folders makeDiscISOs, SOURCES, and COMPANYNAME (use your company name or initials) (if you have more than one company set up a folder for each one… I set up 2 in the example below… RRP and MANH).
The makeDiscISOs folder will hold the bat files that process out picture folders into disc images.
The COMPANYNAME folder will house our images and iso (disk image) files. Under the COMPANYNAME folder, create two (2) new folders named PRE and READY.
The SOURCES folder will contain our extra content, like company info, promotion, print release. Under SOURCES create a folder named COMPANYNAME exactly as you typed it earlier. Under this COMPANYNAME folder, create a CATEGORY folder. (I recommend GENERIC or GENERAL to start). Finally under this CATEGORY folder, place the folders and files you want included on your cds.
And now for the controller. In your makeDiscISOs folder, create a batch script. You can name it whatever you like because you will be running it by hand, but I recommend makeDiscISOs_COMPANYNAME_CATEGORY.bat. I do it this way so that as over time my templates (categories) increase over time, they stay well organised. Think down the road you might have GENERAL, WEDDING, SPORT, PORTRAIT, FAMILY, CORPORATE, CORPORATE2015, CORPORATE2016…..? Well you get the picture.
Your file structure should look something like this.
C:\
---CUSTOMERDISCS
   +++makeDiscISOs
      ---makeDiscISOs_COMPANYNAME_CATEORY.bat
   +++COMPANYNAME
      ---PRE
      ---READY
   +++SOURCES
      ---COMPANYNAME
         +++CATEGORY
            ---COMPANYINFO
            ---PRINT_RELEASE
            ---COUPONS_REFERRAL_WHATEVER
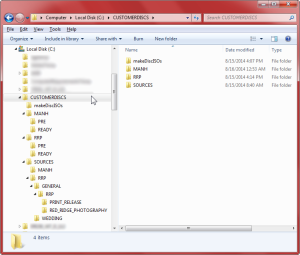
Why so many COMPANYNAME folders? I’m glad you asked. The two higher up on the tree are for organizational purposes. They are set up so you can use the script with multiple companies, or groups (like work vs friends vs family), and the script still knows where everything is supposed to be. The last one, buried deep down in the directory tree under CATEGORY. This one could technically be removed, but when you include a folder into the ISO image of the disc, that folder name appears on the root of your burned disc. Setting it up as above, you will have two folders on your burned disc, one of the customer name (or however you name your export folder in lightroom, we’ll look at that in a bit). The second folder will be COMPANYNAME and have all your accessory files in it, rather than having a folder named the same as your CATEGORY, like wedding or general. That would just look weird on the disk.
Setup Step 2: Editing the batch file.
This one is a bit of a doozy. I will try to be as clear as possible with the comments. BTW, any line starting with REM is a comment. I used REM **this is a comment, to make it a bit more clear.
Copy this into your batch script (and change any variable to match the directory structure you just created):
REM **set user variables
REM **type==category in demonstration; ie General, Wedding, etc
SET COMPANY=RRP
SET TYPE=GENERAL

REM **Set runtime variable. Mostly sets up folder locations based on batch script location
REM **you could also hard code them in here
REM **example: SET BATDIR="C:\CUSTOMERDISCS\makeDiscISOs\

REM **batch file folder location
SET BATDIR=%~d0%~p0
REM **images folders location
SET SRC=%BATDIR%..\%COMPANY%\PRE\
REM **accessory files location
SET SRC2=%BATDIR%..\SOURCES\%COMPANY%\%TYPE%\%COMPANY%\
REM **where to save ISO files
SET DEST=%BATDIR%..\%COMPANY%\READY\

REM **this sets cd label to %%~ni (the working directory name, hopefully customer name or id number)
REM **and creates the ISO files
@for /d %%i in ("%SRC%*.*") do "C:\Program Files (x86)\ImgBurn\ImgBurn.exe" /MODE BUILD /BUILDMODE IMAGEFILE /SRC "%SRC%%%~ni\|%SRC2%" /DEST "%DEST%%%~ni.ISO" /VOLUMELABEL %%~ni /START /CLOSE /NOIMAGEDETAILS /PRESERVEFULLPATHNAMES NO /ROOTFOLDER YES
@for /d %%i in ("%SRC%*.*") do RMDIR /S /Q "%SRC%%%~ni\"
Setup Step 3: Create Lightroom Export Preset
We will do this when we process our first CD below. It’s like a two-for!
And that is it for setup. YAY!
The Process
The Process: Step One – Export images from lightroom
Select the customers images in Lightroom.
*note: This batch process is intended for a large amount of orders of only a few images each. 1 individual image on disc for $x or 1 individual, 1 buddy, and 1 team on disc for $x. Pre-pay order kind of jobs where you will photograph 50, 100, 500 or more in a day. Does this work on smaller amounts of discs too? Sure. but if it is going to be a giant weddings that spans 2 or 3 disks, let me know if it works for you. I have not tested whether I need to adjust the script for multiple disks or if the MDS file can handle that on it's own.
*note 2: When you have all orders in for one job, or one category, go ahead and run the batch script. You will run in to issues if you try to process discs with different Categories at the same time. The script will process EVERYTHING in PRE, so make sure it is all for the same type of disc.
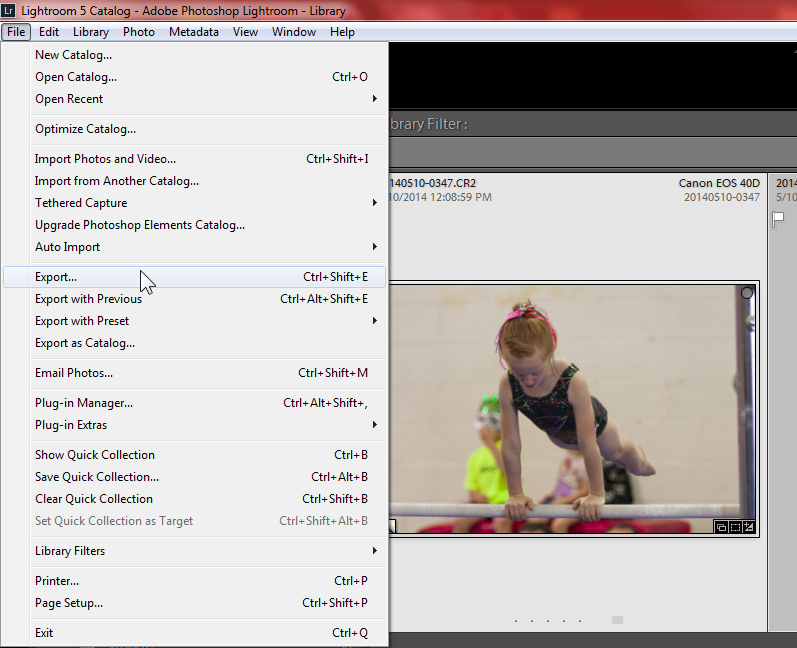
Goto: File->Export to open up the export images dialog.
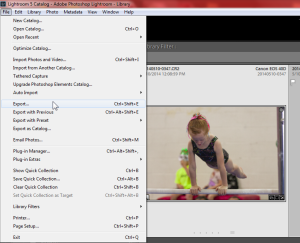
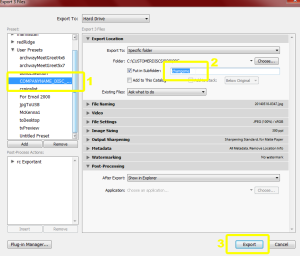
Make sure Export To: is set to Hard Drive, Export Location is set to Specific folder and click the choose button to select your COMPANY’s PRE folder.
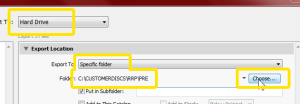
If this is the first time you are doing this, we can make a preset now. Make sure Put in subfolder: is checked and you have a default value filled in (like default or changeme) just in case you forget to type something in when you export next time. Click Add. Name your preset and click Create. You can now select it any time you need to burn a disc and all the setting will be ready for you.
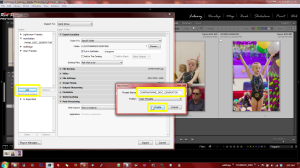
When creating a disc later, Select Preset, put in a meaningful subfolder name. This will also appear on the disk as the folder name all your customers images are in. It will be the disc label they see when they pop it in their computer, and if you choose wisely, it is what you write on the cd/case/label so you know who they are and who to give it to. It keeps things organised so you don’t have to fiddle with envelopes and look up customers based on a random image number in the future. If you are doing this for sports, as I am, I recommend LEAGUE_TEAM#_LASTNAME_FIRSTNAME or something similar. Click Export, and move on to the next cd order and export those as well.
The Process: Step Two – Run your makeDiscISOs batch file
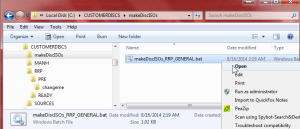
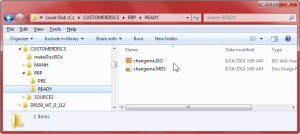
As you can see, the images are put into their own folder below PRE. Go to makeDiscISOs and run makeDiscISOs_COMPANYNAME_CATEGORY.bat. Disc images are created and saved under READY and the folders in PRE are deleted automatically.
The CD folders and files should look something like below
The Process: Step Three – Burn physical discs
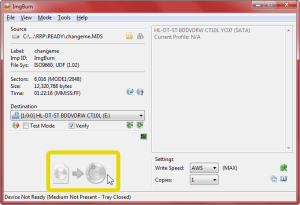
In the READY folder, you can click on either the MDS or the ISO file to burn the disk with ImgBurn.
I like to leave verify turned on, but you can turn it off if you want to…… Then just click the burn icon.
The Process: Step Four – Cleanup
When it finishes, label the disc with your favorite sharpie and delete the MDS and ISO files for that disk. On to the next ISO!
Results
Does this work for my workflow? Will it actually save me time?
Yes, I believe so, but you will have to be the judge of that. Let me know in the comments if it helps you out. For large groups of discs needing to be burned? Definately, for me. Get your order envelopes or order list together. Open lightroom and process all the customers getting discs first. Export them with folders that have meaningful names to your workflow (the same name you will write on their disc label). Run the batch file that creates all the ISOs at once. Remember when you had to do this step for every single one of all 200 CDs that were ordered? This is where your time saving really comes into play. Burn the discs as you are entering information / uploading print orders to your lab.
And remember:
- Set up Ultimate Customer CD (Partial) Automation System
- Use System You Just Set Up
- …… ?
- Profit!
Good Luck!
And here is a zip file windows made for me mirroring my CUSTOMERDISCS folder. Hope it helps.


Leave a Reply